Menu

T4/T4A Info Worksheet

Updated: 2023-01-31

Create a TaxCycle T4/T4A file to prepare T4 or T4A slips. Start a file by carrying forward a slips return from the prior year or by creating a new file from the Start screen.

Use the Info worksheet to enter details about the slip issuer, filing information and the default information that appears on new slips.
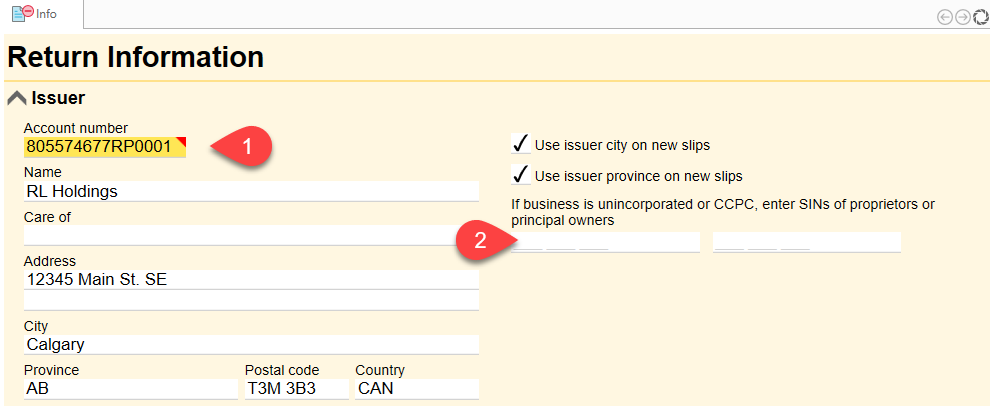
Issuer information

  1. In the Issuer section, enter the business Account number, and the Name and Address of the slip issuer. This information appears on the individual T4 and T4A slips and the final summary return that is submitted to the CRA.
  2. If the business is unincorporated or a Canadian Controlled Private Corporation (CCPC), do not forget to enter the Social Insurance Numbers (SINs) of the proprietors or principal owners.

Screen Capture: Issuer information on the T4 Info worksheet

Set the default city and province for new slips

A check box on the Info worksheet lets you default the city and province for all new slips to the same as the issuer information. This saves you time when preparing individual slips.
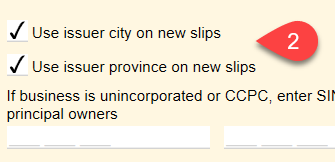
  1. In the Issuer section on the Info worksheet, enter the issuer address, including the city and province.
  2. Check Use issuer city on new slips and/or Use issuer province on new slips.
    Choose to use the issuer city and province as defaults
  3. Start a new, blank slip.
  4. Begin entering data on the new slip.
  5. TaxCycle automatically fills out the City and Province fields.
  6. If a recipient happens to reside in a different city or province, you can still modify these fields on individual slips.

Fields specific to the T4 or T4A on the Info worksheet

The Info worksheet in TaxCycle T4/T4A contains sections for information specific to T4 or T4A returns.
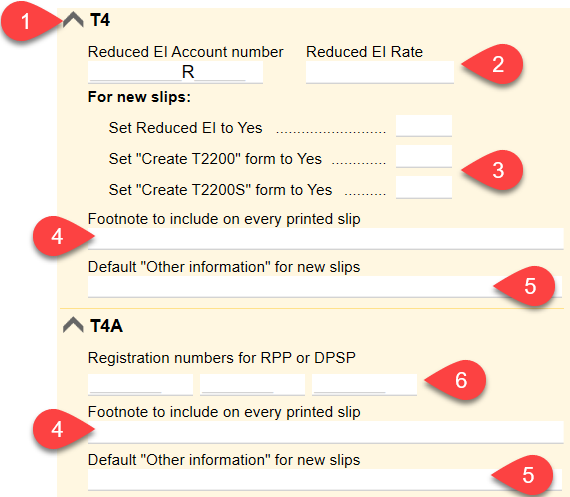
  1. These sections are collapsible. Click the up arrow next to the heading to close a section. Click again to re-open it.
  2. In the T4 section, enter the account number and rate for Reduced EI. Learn more in the T4 Reduced EI help topic.
  3. Set "Create T2200" form to Yes and/or Set "Create T2200S" form to Yes if you would like to create a new T2200 or T2200S form.
  4. Enter a footnote to appear on all slips when printed. See below to learn how.
  5. Set the Default "Other Information" for new slips boxes that appear on all slips in the return. See below to learn how.
  6. In the T4A section, enter the Registration Numbers for RPP or DPSP. These numbers then flow to boxes 071, 072 and 073 on the T4ASummary.

Use the T4 and T4A sections on the Info worksheet to set up specific fields on those slips

Default Other Information boxes to appear on T4 and T4A slips

In the T4 and T4A sections on the Info worksheet, you can choose which Other Information boxes appear by default on all slips:
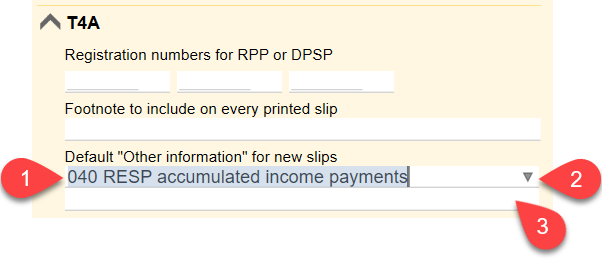
  1. Set the default other information boxesGo to the Default "Other information" for new slips field under the T4 or T4A section on the Info worksheet.
  2. Start typing the box number and TaxCycle will suggest and auto-complete the field. Press Enter when you find the box you want. Or, click the down arrow to select from a full list of possible boxes.
  3. A new, blank field appears below so that you can add more boxes.

If you complete the default Other Information fields on the Info worksheet, they are used as soon as you enter any information on a new slip. These boxes appear in the Other information section on each slip.

You can add more boxes as needed on the individual slips. If you don't need all the default boxes on a particular slip, complete only those you do. Hover over any unneeded boxes and a review message will give you the option to Delete this item or to Delete all rows without amounts:

Screen Capture: Use the Quick Fix to remove unused boxes

Add a footnote to one slip or all slips

To add a footnote to a specific slip, use the field on the slip, just below all the box numbers:

Screen Capture: Add a footnote to an individual slip

To add a footnote to all slips, go to the Info worksheet and enter a footnote. Unlike the per-slip footnotes, this will not be visible in the footnote field on an individual slip, but will appear on the print/PDF copy of the slip. When you have a slip open on screen, scroll down to preview the printed copy. The two footnotes appear in the positions below:
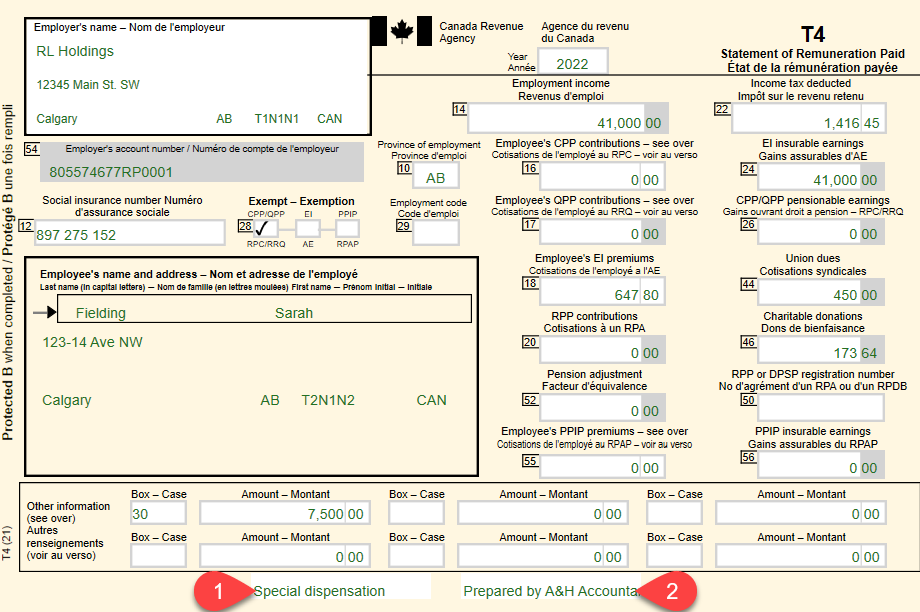
  1. Per-slip footnote
  2. All-slips footnote

Screen Capture: Footnotes at the bottom of T4 Slips

Filing information

Complete the fields in the Slip defaults and Filing sections of the Info worksheet to set information for filing the slips and summary.

Province of employment Choose a province of employment on the Info worksheet and it will automatically flow to the individual slips. You can override this on a particular slip if required.
Default pay period type Set the default pay period on the Info worksheet and it will automatically flow to the individual slips. You can change this on individual slips if required.
Signing date Set the signing date of the return. This date flows to the T4Summary and T4ASummary.
File Relevés for recipients employed in or living in Québec? Choose Yes if you want to also complete the required Relevé for recipients working or living in Québec.
Language of correspondence Choose the language of correspondence of the issuer.
Taxation Year The taxation year will default to the same year as the slips module you are preparing. However, if you need to prepare slips for a year for which the module is not yet available, you can override this field to prepare them early.
Paper file this return? Choose Yes to opt for paper filing this return. The CRA strongly encourages you to file over the Internet using Internet file transfer (XML). However, you can still file up to 50 slips on paper.
Explanatory note (reason for any amended slips) This is an optional field for including notes on why the slips are being amended. The information in this field is sent with the return when it is transmitted by Internet file transfer.

Signing person, Preparer, and Contact person

  1. In the Signing person section on the Info worksheet, enter the information of the person authorized to sign the slip and summary when filing.
  2. Information in the Preparer section flows from Options. If the information in this section does not match that in Options, a message prompts you to update the information.
  3. In the Contact person section, choose the contact person for the return. This information appears at the bottom of the summary and is transmitted to the CRA with the return. This is the person who the CRA will contact if they have any questions about the return.
    • Choose Signing person to use the information entered in the Signing person section.
    • Choose Preparer to use the preparer information set in Options.
    • Choose Other to enter a different contact person in the fields below.
  4. If needed, you can enter a Secondary contact email address. This information is sent to the CRA when you file the return.

Screen Capture: Choose a contact person on the Info worksheet