Menu

Snapshots and Variance

Updated: 2024-09-27

Snapshots allow you to record a point in time for the data in a tax return. Then, you can use this information to make comparisons when planning or to prepare adjustments to the return.
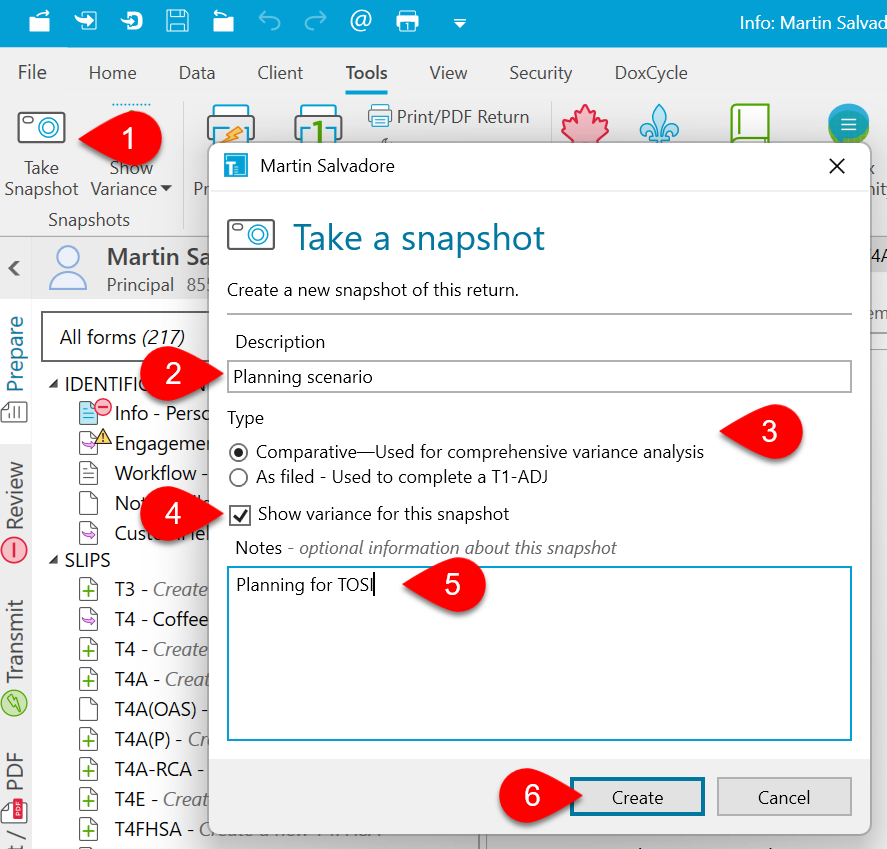
Take a Snapshot

  1. Go to the Tools menu and click Take Snapshot (or, press Ctrl+F10).
  2. (Optional) Enter a Description for the snapshot.
  3. Choose which type of snapshot to save (see below).
  4. (Optional) Check Show variance for this snapshot to immediately enable the comparison between the new snapshot and any subsequent changes.
  5. (Optional) Add Notes to record more details about the snapshot.
  6. Click Create to save the snapshot.
  7. TaxCycle adds a status event to the file history each time you create a snapshot.

Screen Capture: Take a snapshot

Types of Snapshots

TaxCycle creates two types of snapshots. It’s important to understand the difference so you can create the type that works best for what you want to do.

Comparative (automatic or manual)

Captures all the fields in the tax return. Use this snapshot for planning or comparing tax scenarios as you make changes to the file.

As filed (automatic or manual)

Captures only the fields that are needed when filing the return. TaxCycle automatically creates this type of snapshot when you transmit a return using T1 EFILE, TP1 NetFile Québec, ReFILE or T2 Corporation Internet Filing.
Automatic Snapshot Creation

  1. TaxCycle automatically creates an As filed snapshot when you successfully transmit a return or print the T1Condensed for filing on paper in TaxCycle T1.
  2. When you open an existing return in which the Electronic filing or Completed task is already checked, TaxCycle looks for an As filed snapshot. If there isn’t one, it prompts you to create one.  
  3. TaxCycle automatically takes a snapshot when you carry forward a return from the prior year. This snapshot contains the data from the prior year for comparison with the data for the current year. See also Prior Year Variance, below.
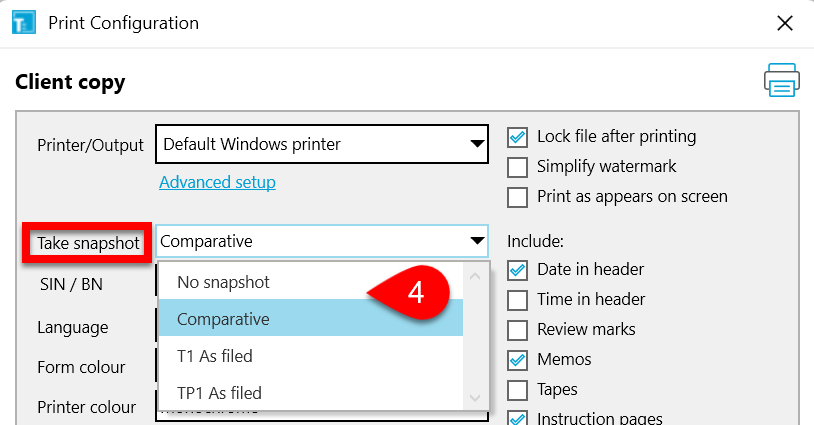
  4. You can also configure TaxCycle to automatically take a snapshot when printing a print set or a form. Choose a snapshot type from the Take snapshot menu in Printer and PDF Output Options.
Screen Capture: Take snapshot menu

Show or Hide Variance

You can use snapshots for comparison. This is useful for planning or to determine the best result for your clients.

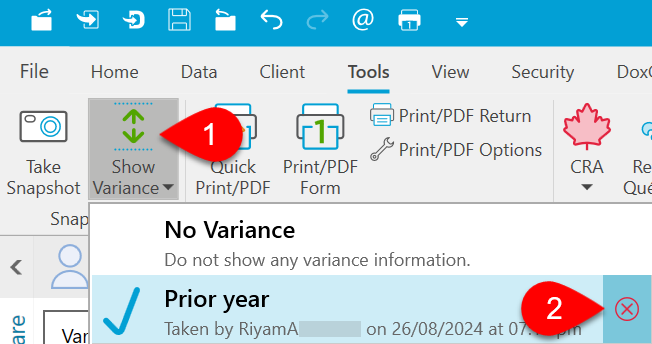
  1. Go to the Tools menu and click Show Variance.
  2. Select a snapshot to use as a comparison. The selected snapshot shows a check mark next to it.
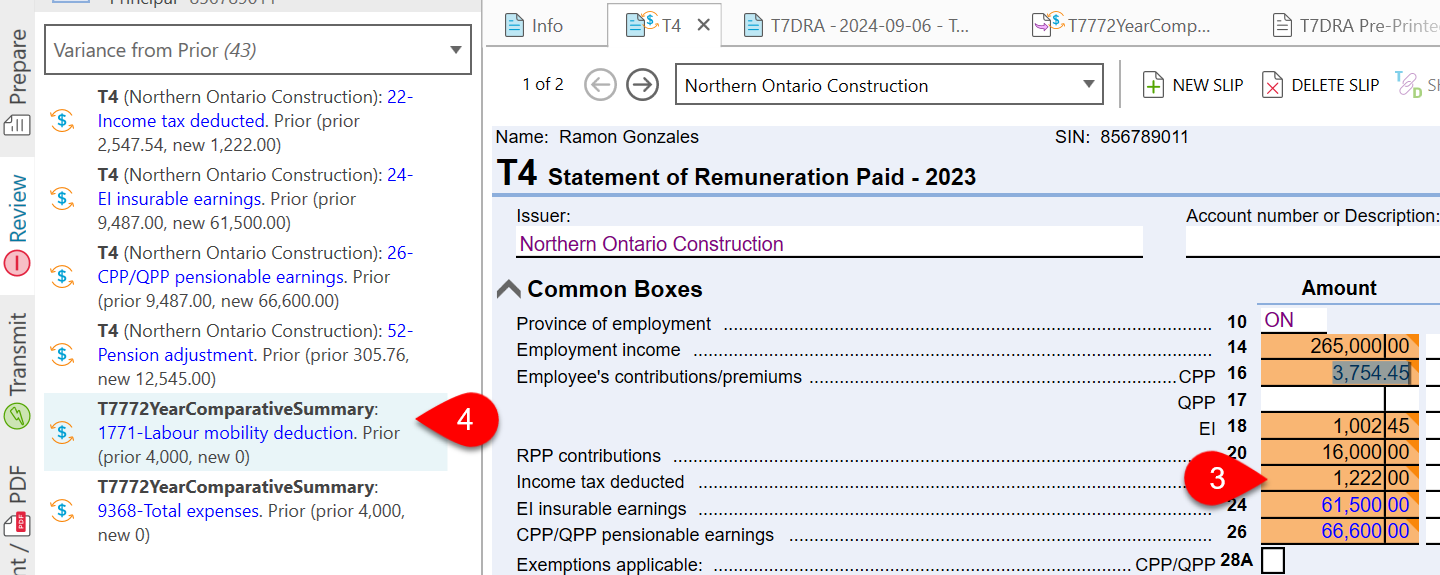
  3. TaxCycle identifies fields and forms that contain values different from the snapshot. Fields with variance from the snapshot have an orange corner and an orange background.
  4. Hover over a field to see the amount recorded in the snapshot.
  5. Forms with variance have a different form icon so they are easy to find.
  6. Select Variance from the views list in the Prepare sidebar to see a list of forms with variance from the snapshot.
  7. Select Variance from the views list in the Review sidebar to see a list of review messages highlighting fields that vary from the snapshot.
  8. To hide variance review messages and end the comparison, select No Variance.

Screen Capture: Show or hide variance

Prior Year Variance

You can highlight all fields that have changed since the prior year. To do this: 
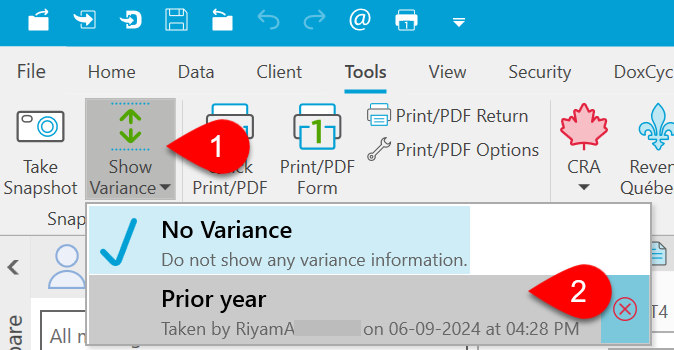
  1. Go to the Tools menu and click Show Variance.
  2. Select the Prior year snapshot.
    Screen Capture: Prior year snapshot
  3. TaxCycle highlights all fields that have changed since the prior year in orange. 
  4. Click on a field or go to the Review Sidebar to see variances. Screen Capture: Orange fields

Adjust Thresholds and Fields that Trigger Variance

You can adjust the thresholds for triggering variance as well as the types of fields that can have variance:
  1. To open Options from the Start screen, click Options in the blue bar on the left side. If you have a file open, go to the File menu, then click Options.
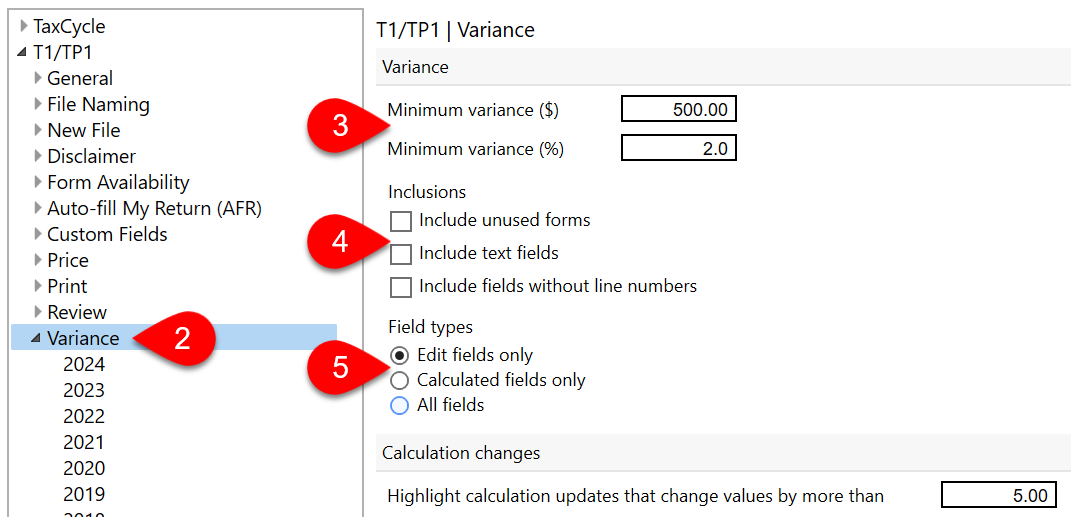
  2. On the left side of the dialog box, expand the T1/TP1 (or any other module) section, then click on Variance to set the same options for all years. Or, expand Variance and click on a year to set different options for each year.
  3. Set a minimum dollar amount or percentage that triggers variance messages.
  4. Check the boxes to Include unused forms, text fields, or fields without line numbers.
  5. Variance is detected on All fields by default, but you can choose to restrict it to Edit fields or Calculated fields instead.

Screen Capture: Variance options

Delete Snapshots

  1. All snapshots appear in the order taken under Show Variance on the Tools menu.
  2. To delete a snapshot, click the delete button to the right of the snapshot’s name.

Screen Capture: Delete snapshot